I'm off galavanting around Denver whilst celebrating my 8th wedding anniversary with Dear Hubby, so my friend Shannon (whom I met at a local pregnant pilates class with my gargantuan belly you saw last week) is here to share an awesome how-to with you...how to make tamales. She mentioned a week or two ago that she was making them and then posted some pics on FB, which had me drooling and wishing I could try them myself. We were planning a playdate with our two toddlers (her son is a few months younger than Babycakes), and I asked her if we could make tamales instead as our toddler activity. She agreed!
Meet Shannon:
Wait! Please, wait! Don’t click away because you know that tamales are made with lard and you are here for another amazingly healthy Kelly creation and just who is this guest blogger interrupting your morning anyway? Well hang with me despite the possible misgivings, and you will learn how to make the healthiest version of tamales you can and still have authentic texture and wonderful taste. Now, I would not recommend replacing all meals with these tamales, though I assure you, you will want to, however everything in moderation (including tamales binges) is a philosophy that I include in my version of a healthy lifestyle. Recently I completed a survey for my health insurance company and at the end they told me they did not have any suggestions for me and to “Keep up the good work!”. I share this with you as my way of validating my claim to be worthy of posting here in this healthy living blog while still giving you the secrets to tamales.
So a little about me, my name is Shannon and I am a stay-at-home-mom currently. I have done many and varied things of my thirty odd years, including graduate work in two fields and military service as a mechanic. In addition to my SAHM job, I have also started an organic soap company, Bare Path Organic Sundries, with my cousin. We are still in the development phase so our Facebook presence is a photoblog of our journey to start-up a company. My hope with the start-up photoblog is that we take what is, for me, an overwhelming process and provide a road map for other entrepreneurial women that have a craft or art or talent they like so much that they too want to share it with the world. Bare Path is currently in the testing and development phase and we hope to have an online storefront by the end of fall in time for Christmas orders.
Of all the things I have done in my life, my favorite is the mommy gig. Becoming a mom gave me a new perspective on the world, nutrition, and our environment. I went from the average American, eating and drinking whatever the system was feeding me and battling with weight issues since my early teens, to taking a vested interest in what my family puts into and on their bodies. I have done a ton of research on what makes food healthy, dangerous common household chemicals, product sustainability, and environmentally conscious practices. As a result of my studies I feel I am much better equipped to make more educated decisions for my family. I have also taken steps to help reduce our “take” from the world by composting, recycling, up-cycling, and making the best effort I can to purchase products from companies that are both socially and ecologically sustainable and conscientious. From the changes I have made and will continue to make for my family we have seen a time of great health on many fronts and feel very hopeful about our future and the role we will have in shaping it. Now, being that I am not an authoritative figure on healthy living and simply a woman who loves to share her point of view with the world, I will get to what I am sure you have stuck around for...the tamales!
How to Make Tamales:
Tamales have always been a favorite of mine and I have had the good fortune to have a wonderful family friend from Mexico that taught me how to make them. Thank you Solo! Making tamales is a time consuming task and throughly worthwhile. It is always better if you have a helper and plan to spend 2-3 hours completing the process. I usually make a double batch and then wish I had made it a triple as I am eating my last tamale a few short days later! Start by collecting the ingredients and setting up your workspace, I have included a printable recipe at the end, which lists ingredients and gives you brief directions. You will be making an assembly line, so place each filling component in a bowl, the masa mixture will also get its own bowl, also I suggest a cookie sheet lined with towels to place the assembled tamales on prior to steaming.
The next step after clearing your workspace and assembling your tools is placing the corn husks in a warm water bath to soften them. Set the soaking husks aside. Next, if you haven’t already cooked the meat you will use go ahead and do that, season as you prefer. For this tutorial we are using canned moose meat. In addition to moose meat we will fill our tamales with some fresh roasted Anaheim green chiles and shredded cheese. After your meat is cooked, shred or chop it as you like, place in bowl and set it aside.
To prep the chiles, under cool water, rinse and peel the roasted skin off of the chiles. Next cut the stems off, de-vein and seed the chiles (basically the same stuff you would remove from a bell pepper). After they are cleaned, chop or slice to your desire and place in a bowl and set it aside. Also shred your cheese, and set aside in a bowl.
That’s it for the filling. Now let’s make our masa! From what I have read, most tamale dough recipes read the same: masa, broth/water, lard, baking powder and salt. To make these a touch healthier, I substitute vegan shortening for the lard (still hydrogenated oil but at least it’s not animal fat). Measure all of the dry ingredients first and place in a bowl and mix. Add the broth, I would suggest using broth though you can use water, the flavor isn’t as nice.
In a separate bowl place the shortening and whisk it until it is fluffy (it will go from a semi-solid to more of a whipped cream or frosting consistency as you whisk), the fluffier it is the less dense and heavy the tamales will turn out, so whisk away! Pictured is Kelly’s first ever shortening whisking, it is looks great! After the shortening is whisked combine it with the dry ingredients and knead by hand. I would recommend going ahead and removing your rings before doing this job. I would strongly suggest you at least try mixing the dough by hand, it really does give the tamale dough a better texture overall.
After all of your components are assembled, place them on a work surface in an order that makes sense to your brain. As pictured here, Kelly has placed the soaking corn husks at the beginning to the left, followed by the masa dough and fillings and completed by the cookie sheet of assembled tamales. We are ready to start assembly! (Kelly here...I look so serious!! You CAN smile whilst assembling tamales, just fyi.)
Begin by picking out a husk and placing it in front of you so the smaller end points towards you and it looks like a “V”. You want to use only the husks that are not torn, not too stiff (the outer husks can be too rigid to fold), and not too small. I know this might sound overwhelming, but just spend some time looking through your husks and you will see what I mean. Generally only 60-75% of the husks in a package are useable for tamales. If that seems like a lot of waste to you, keep in mind that as you progress in your tamale making you will be able to see smaller husks that can act as “patches” for larger torn husks and will be able to make better use of husks. For your first time though, do yourself a favor and only use prime husks.
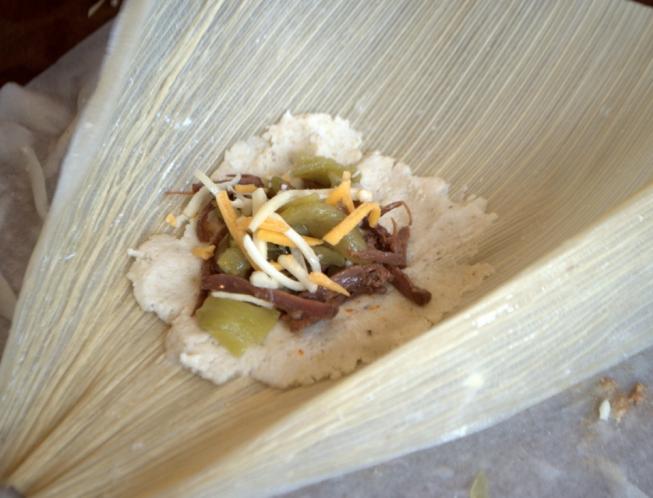
Take roughly an 1/8th-1/4th of a cup of masa dough in hand (slightly wet your finger tips with water to facilitate optimum dough manipulation) and spread over center of a corn husk. I would recommend pulling a little of the dough toward the smaller end of the husk as this will act to enclose the filling when wrapping the tamale (not pictured). then place a pinch each of your fillings. Tamales are not traditionally very big, so go easy on the filling, these should be about 3-4 bites each and the masa dough will plump a bit. After you have all your filling placed then we start the fold.
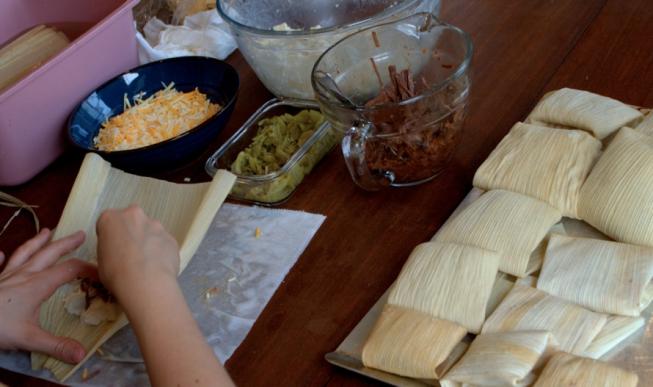
My suggested method is to fold the bottom/smaller end up first, then the left side in, next the right side in and finally the top down. Don’t worry if it takes a few or you find a better method, there is no exact science here, just make a little envelopes around the tamales and stack them on the cookie sheet flap down to hold them closed until we steam them.
Now that you have become a master tamale folder, take your tray of tamales to the stove. Place your steamer basket in your pot, add enough water to almost meet but not touch the bottom of the basket, and layer your tamales onto the basket. Put as many tamales as there is room with out overstuffing, as the steam needs to be able to circulate. If you have a large pot you may be able to get in one whole batch. For example: I have a standard dutch oven (pictured) and I usually do two batches over three steamings.
Place a tight fitting lid over the pot and steam the tamales for 60 minutes. After an hour, pull out a tamale from the center top and open, if the masa dough is gooey at all, steam for another 10-15 minutes.
After allowing them to cool slightly, unwrap the tender morsel and enjoy! The tamale should peal right off of the husk. We like to use the husk as a wrapper and eat them right out of it with our fingers :) Any tamales that aren’t immediately consumed can be frozen nicely and will last that way for a long time...I have been know to find an odd tamale hiding in my freezer after three months and I, having no shame, heated that sucker up and it was still delish!
Speaking of reheating, about a minute in the microwave works for a quick snack, however if you are reheating a bunch I would like to suggest over a fire. We did this on our last camping trip, just tossed them right in next to the coals in the campfire, and they came out smoky and perfectly toasted! So yummy I nearly died. So when my husband suggested doing the left overs on the grill I immediately extolled him as the genius he is and we fired them up right in our back yard. If possible they were even more perfectly toasted though not as deliciously smoky ;) I would suggest keeping a spray bottle of water at hand for grilling tamales as the corn husks like to catch fire, one quick spray retards the ignition process significantly.
Thank you for hanging with me, I hope you enjoyed reading about the tamale making process and that I demystified it enough that you are already making a mental list of things you need to get...or at least will click the print button for future reference.Please remember to have fun with this recipe, tamales can be very versatile and non-traditional!
-Shannon
Ingredients: 1 pkg corn husks (found at some grocery stores, farmer’s markets and unfortunately at most Wal-Marts)
Masa Dough 2 cups organic masa 2 cups organic broth 1 tsp organic baking powder 1/2 tsp sea salt 2/3 cup organic vegan shortening (not because am a vegan, but the idea of using lard is very unappetizing to me)
Filings 2 cups cooked chopped/shredded organic/wild caught meat (we used canned Alaskan moose) 1 cup shredded organic cheese of choice 1/2 cup chopped mild roasted green chiles
Tools: Cookie sheet/platter Dutch oven/large pot Steamer Basket Various mixing bowls Measuring and other utensils (whisk)
Instructions: 1. Soak corn husks 2. Assemble/prepare filling items 3. Prepare masa dough 4. Assemble tamales a. 1/8th - 1/4th cup masa dough per husk, centered with a small “tail” pulled toward the smaller end of the husk b. a pinch of each filling item c. fold: bottom, left, right, top 5. Steam tamales for 60 minutes 6. Allow to cool slightly 7. Eat and enjoy! a. Freeze unused portion for reheating in: i. oven ii. microwave iii. the grill iv. campfire
I'm off galavanting around Denver whilst celebrating my 8th wedding anniversary with Dear Hubby, so my friend Shannon (whom I met at a local pregnant pilates class with my gargantuan belly you saw last week) is here to share an awesome how-to with you...how to make tamales. She mentioned a week or two ago that she was making them and then posted some pics on FB, which had me drooling and wishing I could try them myself. We were planning a playdate with our two toddlers (her son is a few months younger than Babycakes), and I asked her if we could make tamales instead as our toddler activity. She agreed!
Meet Shannon:
Wait! Please, wait! Don’t click away because you know that tamales are made with lard and you are here for another amazingly healthy Kelly creation and just who is this guest blogger interrupting your morning anyway? Well hang with me despite the possible misgivings, and you will learn how to make the healthiest version of tamales you can and still have authentic texture and wonderful taste. Now, I would not recommend replacing all meals with these tamales, though I assure you, you will want to, however everything in moderation (including tamales binges) is a philosophy that I include in my version of a healthy lifestyle. Recently I completed a survey for my health insurance company and at the end they told me they did not have any suggestions for me and to “Keep up the good work!”. I share this with you as my way of validating my claim to be worthy of posting here in this healthy living blog while still giving you the secrets to tamales.
So a little about me, my name is Shannon and I am a stay-at-home-mom currently. I have done many and varied things of my thirty odd years, including graduate work in two fields and military service as a mechanic. In addition to my SAHM job, I have also started an organic soap company, Bare Path Organic Sundries, with my cousin. We are still in the development phase so our Facebook presence is a photoblog of our journey to start-up a company. My hope with the start-up photoblog is that we take what is, for me, an overwhelming process and provide a road map for other entrepreneurial women that have a craft or art or talent they like so much that they too want to share it with the world. Bare Path is currently in the testing and development phase and we hope to have an online storefront by the end of fall in time for Christmas orders.
Of all the things I have done in my life, my favorite is the mommy gig. Becoming a mom gave me a new perspective on the world, nutrition, and our environment. I went from the average American, eating and drinking whatever the system was feeding me and battling with weight issues since my early teens, to taking a vested interest in what my family puts into and on their bodies. I have done a ton of research on what makes food healthy, dangerous common household chemicals, product sustainability, and environmentally conscious practices. As a result of my studies I feel I am much better equipped to make more educated decisions for my family. I have also taken steps to help reduce our “take” from the world by composting, recycling, up-cycling, and making the best effort I can to purchase products from companies that are both socially and ecologically sustainable and conscientious. From the changes I have made and will continue to make for my family we have seen a time of great health on many fronts and feel very hopeful about our future and the role we will have in shaping it. Now, being that I am not an authoritative figure on healthy living and simply a woman who loves to share her point of view with the world, I will get to what I am sure you have stuck around for...the tamales!
How to Make Tamales:
Tamales have always been a favorite of mine and I have had the good fortune to have a wonderful family friend from Mexico that taught me how to make them. Thank you Solo! Making tamales is a time consuming task and throughly worthwhile. It is always better if you have a helper and plan to spend 2-3 hours completing the process. I usually make a double batch and then wish I had made it a triple as I am eating my last tamale a few short days later! Start by collecting the ingredients and setting up your workspace, I have included a printable recipe at the end, which lists ingredients and gives you brief directions. You will be making an assembly line, so place each filling component in a bowl, the masa mixture will also get its own bowl, also I suggest a cookie sheet lined with towels to place the assembled tamales on prior to steaming.
The next step after clearing your workspace and assembling your tools is placing the corn husks in a warm water bath to soften them. Set the soaking husks aside. Next, if you haven’t already cooked the meat you will use go ahead and do that, season as you prefer. For this tutorial we are using canned moose meat. In addition to moose meat we will fill our tamales with some fresh roasted Anaheim green chiles and shredded cheese. After your meat is cooked, shred or chop it as you like, place in bowl and set it aside.
To prep the chiles, under cool water, rinse and peel the roasted skin off of the chiles. Next cut the stems off, de-vein and seed the chiles (basically the same stuff you would remove from a bell pepper). After they are cleaned, chop or slice to your desire and place in a bowl and set it aside. Also shred your cheese, and set aside in a bowl.
That’s it for the filling. Now let’s make our masa! From what I have read, most tamale dough recipes read the same: masa, broth/water, lard, baking powder and salt. To make these a touch healthier, I substitute vegan shortening for the lard (still hydrogenated oil but at least it’s not animal fat). Measure all of the dry ingredients first and place in a bowl and mix. Add the broth, I would suggest using broth though you can use water, the flavor isn’t as nice.
In a separate bowl place the shortening and whisk it until it is fluffy (it will go from a semi-solid to more of a whipped cream or frosting consistency as you whisk), the fluffier it is the less dense and heavy the tamales will turn out, so whisk away! Pictured is Kelly’s first ever shortening whisking, it is looks great! After the shortening is whisked combine it with the dry ingredients and knead by hand. I would recommend going ahead and removing your rings before doing this job. I would strongly suggest you at least try mixing the dough by hand, it really does give the tamale dough a better texture overall.
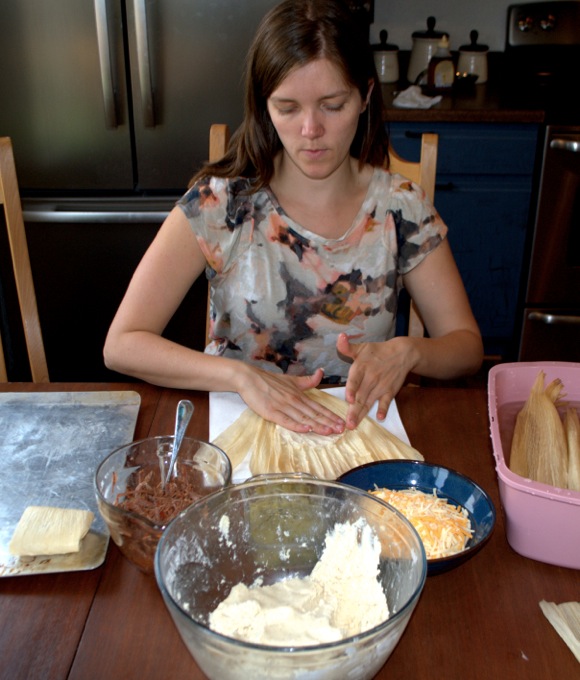


After all of your components are assembled, place them on a work surface in an order that makes sense to your brain. As pictured here, Kelly has placed the soaking corn husks at the beginning to the left, followed by the masa dough and fillings and completed by the cookie sheet of assembled tamales. We are ready to start assembly! (Kelly here...I look so serious!! You CAN smile whilst assembling tamales, just fyi.)
Begin by picking out a husk and placing it in front of you so the smaller end points towards you and it looks like a “V”. You want to use only the husks that are not torn, not too stiff (the outer husks can be too rigid to fold), and not too small. I know this might sound overwhelming, but just spend some time looking through your husks and you will see what I mean. Generally only 60-75% of the husks in a package are useable for tamales. If that seems like a lot of waste to you, keep in mind that as you progress in your tamale making you will be able to see smaller husks that can act as “patches” for larger torn husks and will be able to make better use of husks. For your first time though, do yourself a favor and only use prime husks.
Take roughly an 1/8th-1/4th of a cup of masa dough in hand (slightly wet your finger tips with water to facilitate optimum dough manipulation) and spread over center of a corn husk. I would recommend pulling a little of the dough toward the smaller end of the husk as this will act to enclose the filling when wrapping the tamale (not pictured). then place a pinch each of your fillings. Tamales are not traditionally very big, so go easy on the filling, these should be about 3-4 bites each and the masa dough will plump a bit. After you have all your filling placed then we start the fold.
My suggested method is to fold the bottom/smaller end up first, then the left side in, next the right side in and finally the top down. Don’t worry if it takes a few or you find a better method, there is no exact science here, just make a little envelopes around the tamales and stack them on the cookie sheet flap down to hold them closed until we steam them.
Now that you have become a master tamale folder, take your tray of tamales to the stove. Place your steamer basket in your pot, add enough water to almost meet but not touch the bottom of the basket, and layer your tamales onto the basket. Put as many tamales as there is room with out overstuffing, as the steam needs to be able to circulate. If you have a large pot you may be able to get in one whole batch. For example: I have a standard dutch oven (pictured) and I usually do two batches over three steamings.
Place a tight fitting lid over the pot and steam the tamales for 60 minutes. After an hour, pull out a tamale from the center top and open, if the masa dough is gooey at all, steam for another 10-15 minutes.
After allowing them to cool slightly, unwrap the tender morsel and enjoy! The tamale should peal right off of the husk. We like to use the husk as a wrapper and eat them right out of it with our fingers :) Any tamales that aren’t immediately consumed can be frozen nicely and will last that way for a long time...I have been know to find an odd tamale hiding in my freezer after three months and I, having no shame, heated that sucker up and it was still delish!
Speaking of reheating, about a minute in the microwave works for a quick snack, however if you are reheating a bunch I would like to suggest over a fire. We did this on our last camping trip, just tossed them right in next to the coals in the campfire, and they came out smoky and perfectly toasted! So yummy I nearly died. So when my husband suggested doing the left overs on the grill I immediately extolled him as the genius he is and we fired them up right in our back yard. If possible they were even more perfectly toasted though not as deliciously smoky ;) I would suggest keeping a spray bottle of water at hand for grilling tamales as the corn husks like to catch fire, one quick spray retards the ignition process significantly.
Thank you for hanging with me, I hope you enjoyed reading about the tamale making process and that I demystified it enough that you are already making a mental list of things you need to get...or at least will click the print button for future reference.Please remember to have fun with this recipe, tamales can be very versatile and non-traditional!
-Shannon
Ingredients:
1 pkg corn husks (found at some grocery stores, farmer’s markets and unfortunately at most Wal-Marts)
Masa Dough
2 cups organic masa
2 cups organic broth
1 tsp organic baking powder
1/2 tsp sea salt
2/3 cup organic vegan shortening (not because am a vegan, but the idea of using lard is very unappetizing to me)
Filings
2 cups cooked chopped/shredded organic/wild caught meat (we used canned Alaskan moose)
1 cup shredded organic cheese of choice
1/2 cup chopped mild roasted green chiles
Tools:
Cookie sheet/platter
Dutch oven/large pot
Steamer Basket
Various mixing bowls
Measuring and other utensils (whisk)
Instructions:
1. Soak corn husks
2. Assemble/prepare filling items
3. Prepare masa dough
4. Assemble tamales
a. 1/8th - 1/4th cup masa dough per husk, centered with a small “tail” pulled toward the smaller end of the husk
b. a pinch of each filling item
c. fold: bottom, left, right, top
5. Steam tamales for 60 minutes
6. Allow to cool slightly
7. Eat and enjoy!
a. Freeze unused portion for reheating in:
i. oven
ii. microwave
iii. the grill
iv. campfire